AI story video guide

How to make AI story videos from a single idea

Give your story one character, one surprising problem, and an ending worth reaching. Then turn those beats into a script, review the storyboard, generate the visuals, and finish the narration and pacing in an editable project.

Maintained by the FrameCompose product team · Last reviewed 22 September 2026

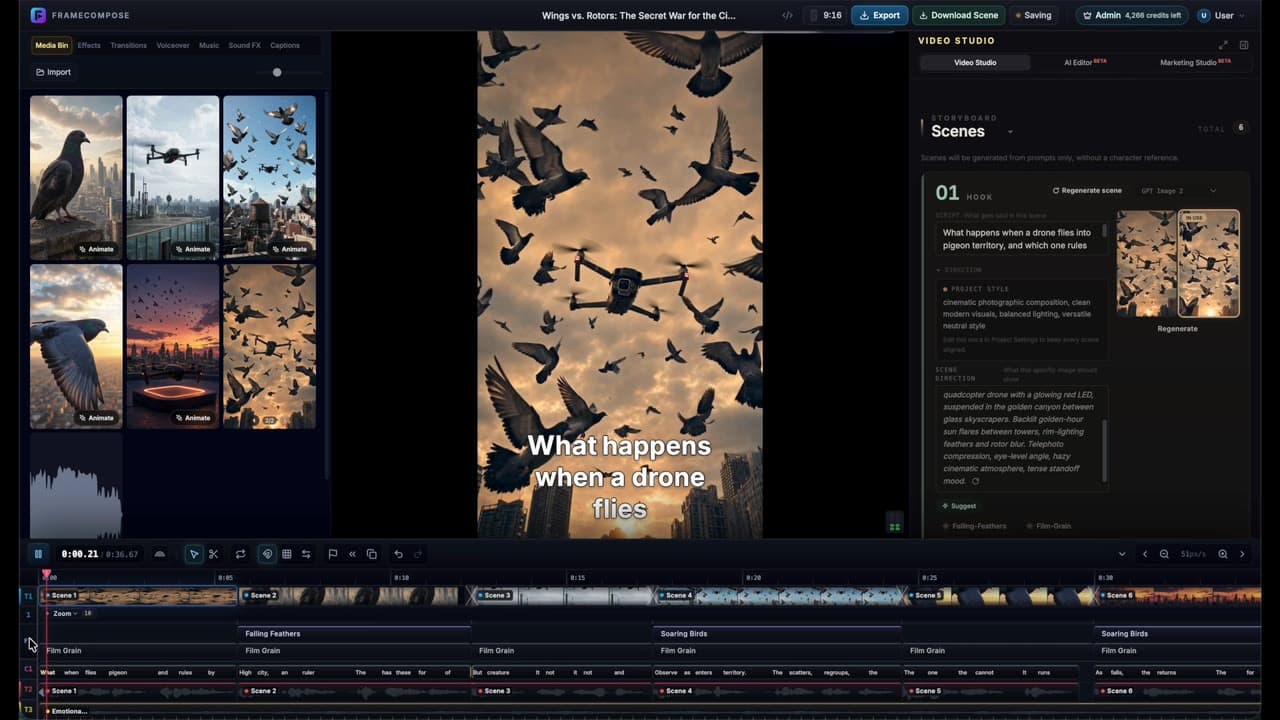
FrameCompose Pigeons vs Drones demo with a generated short beside its editable scenes and timeline
A real FrameCompose project: Pigeons vs Drones. The forest story below is a separate written planning example.

Start with a premise that has a visible change and a clear payoff.

Review the script and scene cards before generating the remaining visuals.

Keep character details stable and give each shot one visual job.

Repair individual scenes, check captions, and export the finished edit.

1. Write an idea with a cause and a consequence

“A magical train station” is a setting. A cleaner whose small act of kindness brings the station back to life is a story. Name the person, the discovery, the decision, and what changes because of that decision. This gives the script somewhere to go.

For your first short, keep the cast and locations small. A single repeatable setting makes it easier to notice whether the images agree with one another. The example below is an original writing exercise you can adapt; it is not a recording of generated output.

Example story brief: The Last Plant

Use this as an idea brief in Video Studio. Keep production instructions separate from finished narration.

Create a short, gently magical story for vertical video.

Mara, a night-shift cleaner, discovers a tiny forest growing inside a broken vending machine. When she waters it, a dead plant on the station platform comes back to life. She returns with her watering can, and by dawn the neglected station is green again.

Use one recurring character and one station location. Show the discovery, her choice to water the forest, the first revived plant, and the final reveal. Keep the ending warm and the narration concise.

2. Turn the premise into four readable story beats

Draft the narration before asking every image to do something different. Each beat should advance the same story: discovery, choice, consequence, payoff. If a line adds atmosphere but changes nothing, shorten it or give its screen time to the decisive action.

These four beats are a planning outline, not a fixed promise of four generated clips. A longer line or a model’s clip duration may require more than one scene. Check the spoken draft and the resulting scene breaks in Video Studio.

From narration to shot plan

The visual notes describe what the viewer should see; they are not narration.

DISCOVERY
Narration: At midnight, Mara found a forest where the snacks should have been.
Shot: Mara notices tiny trees behind the vending-machine glass.

CHOICE
Narration: She gave it the last water in her can.
Shot: Water falls onto the miniature forest through the open service door.

CONSEQUENCE
Narration: Across the platform, one dead plant lifted its leaves.
Shot: The dry plant becomes green as Mara turns towards it.

PAYOFF
Narration: By the first train, she had brought the whole station back to life.
Shot: A wide view reveals the green station with Mara and her watering can.

3. Review the storyboard and recurring character

Open Video Studio, enter your brief, and choose the format and visual direction for the project. Generate the plan, then read the scene cards in order. The default flow can generate a hook preview during planning; it pauses for you to review the cards before you generate the remaining scenes. Read the displayed generation estimate before each paid action.

Check that each scene has one clear subject and that the ending follows from the earlier action. Select your recurring character and references before making the rest of the visuals. Keep Mara’s face, hair, clothing, and watering can recognisable while changing her pose and the camera framing.

4. Make the scene images agree before adding motion

In an image-first workflow, use each scene image to establish the subject, location, props, lighting, and composition. Compare adjacent images before animating them. Mara should not gain a different uniform, and the vending machine should not move to a different station between shots.

Fix a wrong face, missing prop, or confusing composition at the image stage. Motion is unlikely to rescue an image that already tells the wrong story. Use an uploaded asset when a precise visual matters more than a generated interpretation.

Example image direction for the discovery

Adapt the character description to your selected character and references.

Medium shot of Mara, a cleaner with short dark curls, a navy work jacket, and a yellow scarf, holding a small green watering can. She studies a miniature forest behind the glass of an old vending machine on an empty tiled station platform. Warm light inside the machine contrasts with the cool station lights. The forest and her curious expression are both visible.

5. Animate the moments that move the story forward

A still image with narration can carry context. Spend motion on the moments the viewer needs to witness: Mara noticing the forest, water landing on the trees, or leaves lifting from the dead plant. Give each clip a short action that can finish within its selected duration.

Describe movement rather than rewriting the entire image description. Start with one subject action and a simple camera instruction. If watering, plant growth, and a sweeping reveal compete in one clip, split them into separate shots.

Example motion direction for the discovery

A starting prompt for an image where Mara and the forest are already visible. Results depend on the selected model.

Mara leans slightly towards the glass and raises her eyebrows as she notices the tiny trees. The leaves sway gently inside the vending machine. The camera remains still.

6. Finish narration, captions, and the edit

Listen to the narration while watching the visuals. Let the line about the revived plant land when the viewer can see the change. Shorten a held shot or leave a little more space after the reveal instead of adding extra narration to fill every second.

Review captions at the size people will watch. Correct names and punctuation, keep text clear of the important action, and lower music that competes with the voice. Preview the whole timeline, including the start and end of every replacement, before export.

Frequently asked questions

A few quick answers before you jump in.

Can I make an AI story video from one sentence?

Yes. Use the sentence as an idea brief, then review the expanded script and storyboard. A useful starting sentence identifies a character, a problem or discovery, and a consequence. You still choose which scenes to generate and how to finish the edit.

Do I need to generate a video clip for every scene?

No. A story can mix still images, generated clips, and uploaded footage. Use motion where an action or reveal needs it, and let narration and pacing carry simpler shots.

What is the difference between a story idea generator and a story video maker?

An idea generator helps you choose a premise or angle. A story video workflow also turns the writing into scene visuals, narration, captions, and a timed edit that you can export. FrameCompose’s free idea tool helps with the first step; Video Studio handles video creation.

How do I keep an AI story from feeling like unrelated clips?

Use a cause-and-effect script, consistent character references, a stable setting, and one visual purpose per scene. Compare each shot with its neighbours and repair continuity errors before adding more effects.

Is generating an AI story video free?

You can read and adapt the examples here for free. Image, video, and voice generation depend on the selected model and your account’s access and credits. Check the current pricing and the estimate shown before generating.

Related pages

Explore the rest of the workflow, from first idea to final export.