Script-to-video guide

Keep the approved script. Build a visual plan around it.

Script-to-video works best when the words are treated as the source of truth. Divide the script into meaningful beats, create one clear visual job for each scene, generate the first draft, and repair individual scenes instead of rewriting everything.

Maintained by the FrameCompose product team · Last reviewed 12 August 2026

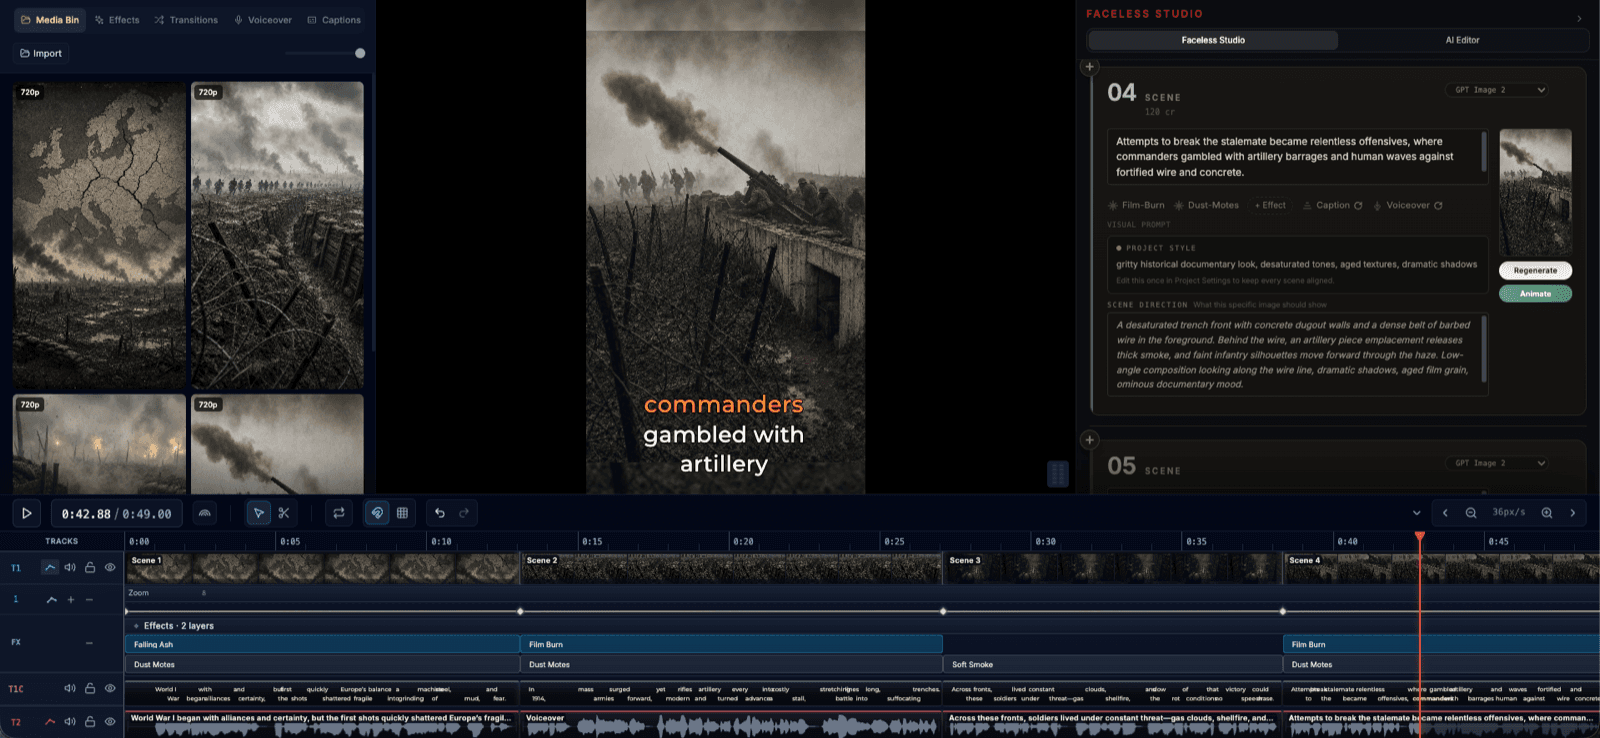
FrameCompose Video Studio with a script, generated scenes, captions, voiceover, and timeline
The source script becomes editable scenes, narration, captions, and media.

Prepare the script for spoken delivery before generating media.

Split it into visual beats instead of equal-sized text chunks.

Generate narration, captions, and visuals as an editable first draft.

Repair individual scenes while preserving approved language.

1. Prepare the script for speech

Read the script aloud and simplify sentences that are difficult to say or understand in one pass. Mark names, numbers, acronyms, and pronunciations that need special attention. Remove headings or production notes that should not become narration.

If exact wording has been approved, label it clearly. Decide in advance whether minor narration edits are allowed or whether the video must preserve every sentence verbatim.

2. Divide the words into visual beats

Start a new scene when the subject, claim, location, example, or emotional beat changes. Avoid splitting only because a paragraph reaches a fixed word count; one idea may need two quick visuals while another needs time to land.

Write a plain visual purpose for each beat. “Show the cost falling after automation” directs a useful scene better than repeating the narration as an image prompt.

3. Generate a first draft, not a final answer

Choose the aspect ratio, visual style, voice, pacing, and caption treatment, then generate the draft. Review whether every scene supports the spoken line before spending time on effects or polish.

Use references or uploaded media when a person, product, place, or brand detail must be accurate. Generated imagery is not a substitute for evidence or licensed source material.

4. Edit the smallest element that failed

If a visual is wrong, replace that visual while keeping the line. If the narration is awkward, fix the spoken sentence and its captions before creating another image. Retiming may solve a scene that is correct but too fast to understand.

Preview both joins around every replacement. The repaired scene should match the pacing, voice, music, and visual direction of its neighbours.

5. Run a final script and rights check

Compare the final narration and captions with the approved source. Check spelling, names, figures, quotations, disclaimers, and the relationship between each claim and its visual.

Confirm that uploaded footage, music, images, logos, and generated media can be used in the intended context before export.

Frequently asked questions

A few quick answers before you jump in.

Can AI make a video from a complete script?

Yes. A script can be divided into scenes and used to create narration, captions, and visual directions, but the generated draft still needs human review and editing.

Will the AI change my script?

That depends on the workflow. Mark exact approved language as fixed and review the final narration against the source before publishing.

How many scenes should a script become?

Use enough scenes to give each meaningful visual beat a clear job. Do not force every sentence into a separate shot or divide the script only by word count.

Can I replace only one generated scene?

Yes. In an editable scene-based workflow, one visual, line, caption block, or duration can be changed without rebuilding the accepted scenes.

Related pages

Explore the rest of the workflow, from first idea to final export.